TUBELESS

WHAT ARE THE ADVANTAGES OF A TUBELESS TIRE?


Tubeless tires provide clear advantages in speed, comfort, grip and puncture protection. They avoid unnecessary friction between tire and tube, which significantly reduces the rolling resistance, far below that of folding tires or tubulars. Tubeless tires can be used with a lower inflation pressure without compromising performance. That brings clear advantages in comfort as well as more control n critical situations and poor road/trail conditions. At the same time, tubeless systems provide a high puncture protection. The danger of blowouts is clearly reduced. A sudden loss of air pressure by burst tubes or valve tear off is no longer a worry. What is more, tubeless systems function perfectly together with puncture protection liquids. Punctures are re-sealed within milliseconds.

IS TUBELESS FOR EVERYONE?


The advantages are particularly interesting for sporty drivers who are looking for maximum performance. The system is technically demanding and the optimal standard for the wheels is just finding. If you are simply looking for a tire that works smoothly in everyday life, then a normal Marathon Plus is the better choice for you. If you want the fastest tire with the best driving performance, then there is no way around tubeless.

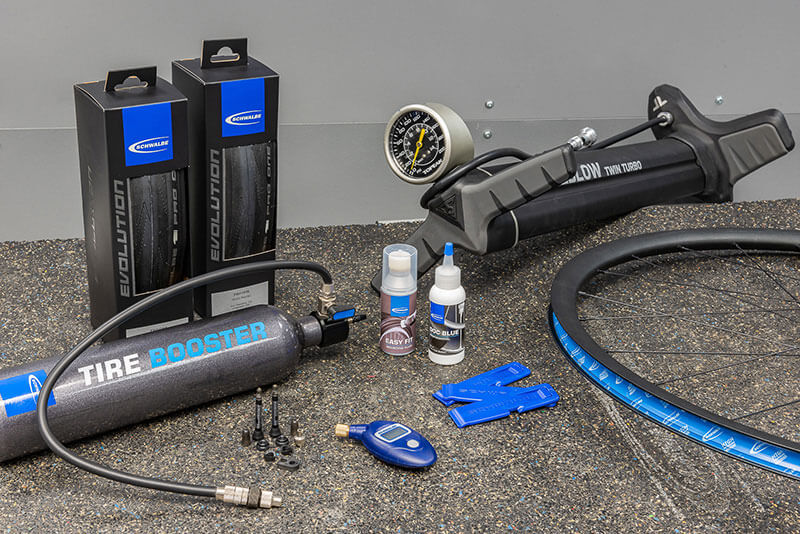
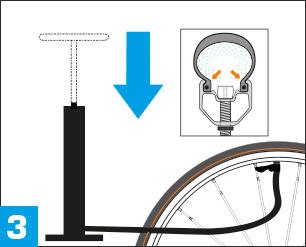
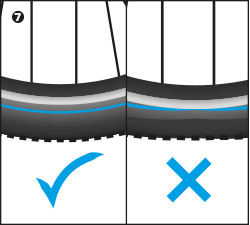
WHAT DO YOU NEED FOR TUBELESS FITTING?


  • Schwalbe tubeless tires
  • Airtight tubeless wheel
  • (or tubeless-ready wheel and tubeless rim tape)
  • Tubeless valve
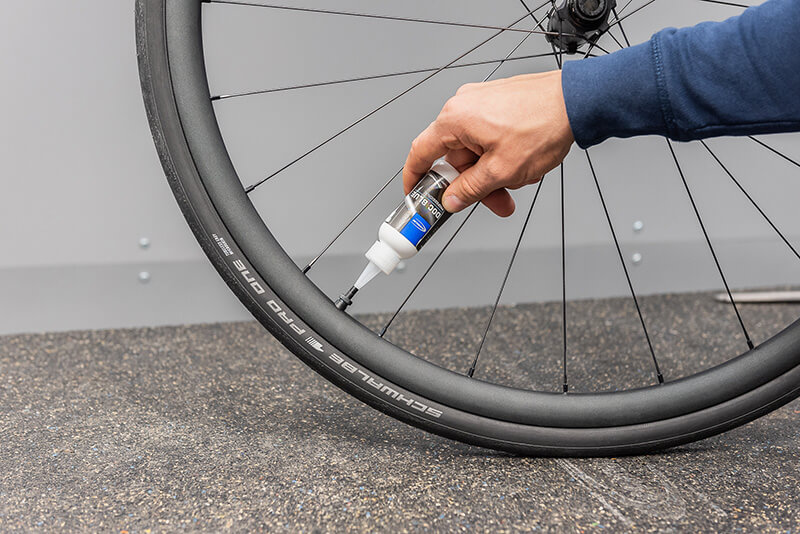
  • Sealing liquid (e.g. Schwalbe Doc Blue)
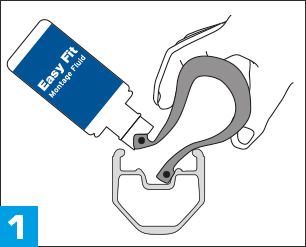
  • Mounting fluid (e.g. Schwalbe Easy Fit)
  • Track pump with air gauge
  • A rag
! Note: A compressor or the Schwalbe Tire Booster can be very helpful for inflation.
! Note: You should be familiar with the specific fitting procedure. Otherwise you should leave the fitting to an expert.
HOW TO FIT TUBELESS?

Fit the tire as usual onto the rim. Use tire levers with care. Important: Apply mounting fluid (Easy Fit) to both tire beads before inflating (1). Make sure the valve is between the beads when inflating (2). Start inflating with a boost of air (track pump, compressor or tire booster) (3). The tire engages audibly on the rim. Using the rim outline, make sure the tire is properly in place (4).

Deflate the tire. Remove the valve core (valve key is supplied with Doc Blue) and fill in 60 ml of the sealant (5). For road bikes 30 ml are enough.
Best start directly to the first ride. The sealing is only completed when the tire has worked and the carcass is completely coated with sealant. Repump after 24 hours.

! Note: Strictly follow the indication for maximum inflation pressure of tire and rim!
! Note: Do not use CO2 cartridges. CO2 has a negative effect on the sealant.
! Note: Be careful when using the sealant. It easily causes stains on clothing, pieces of furniture or floor.
APPLICATION
For preventive puncture protection and tubeless conversion. Filling quantities: tires from 23-60mm —> 60-90 ml/tire, from 62-100mm —> 90-120 ml/tire. Shake well! Effective up to 7 months. Unsuitable for significant defects (cuts/bursts). Tubeless conversion only with wheels and tires suitable for tubeless applications.

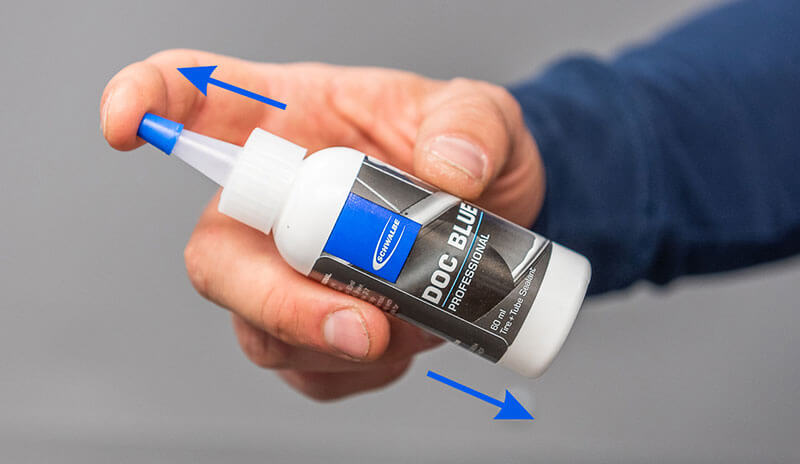
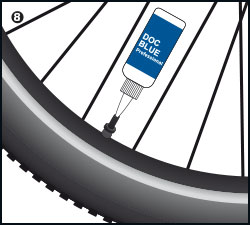
HOW MUCH SEALING MILK DO I HAVE TO FILL IN?


The filling quantity differs depending on the width of the tire.

Tires from 23-60 mm -> 60-90 ml/tire.

Tires from 62 -100 mm -> 90 -120 ml/tire.

Shake well! The sealing milk works up to 7 months.

Not suitable for coarse defects (cuts / punctures).

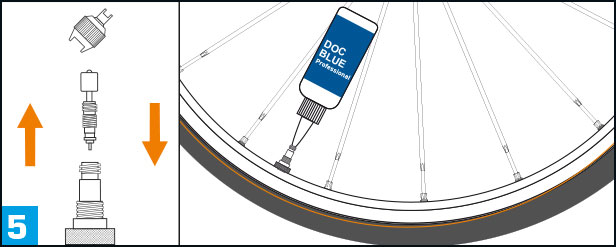
DO I HAVE TO INSERT THE SEALANT THROUGH THE VALVE?


No, you can fill the sealant directly into the tire before mounting the second tire bead. Filling through the valve has the advantage of a „cleaner“ working process. The milk is only applied when the tire is already locked on the rim. This is particularly convenient when you do not know if your tire/rim-combination will work perfectly.

With common combinations, it is faster to pour in the sealant directly. If you use valves without removable cores, filling directly through the valve is impossible anyway.

WHY DO I NEED SEALANT?


Tubeless Easy tires are not completely airtight tubeless tires. You need the sealant to guarantee they are airtight. A sealant can do this more effectively than an impermeable butyl liner.

Real tubeless tires, like you may have had in the past, did, in theory, work without sealant. But they were much heavier and in practice most riders still utilized a sealant. In the end, it was only the sealant that made the system reliable enough for regular riding.
In addition, the combination of Tubeless Easy tires and Doc Blue ensures superior protection against punctures and the sealant has no negative effects on rolling resistance.

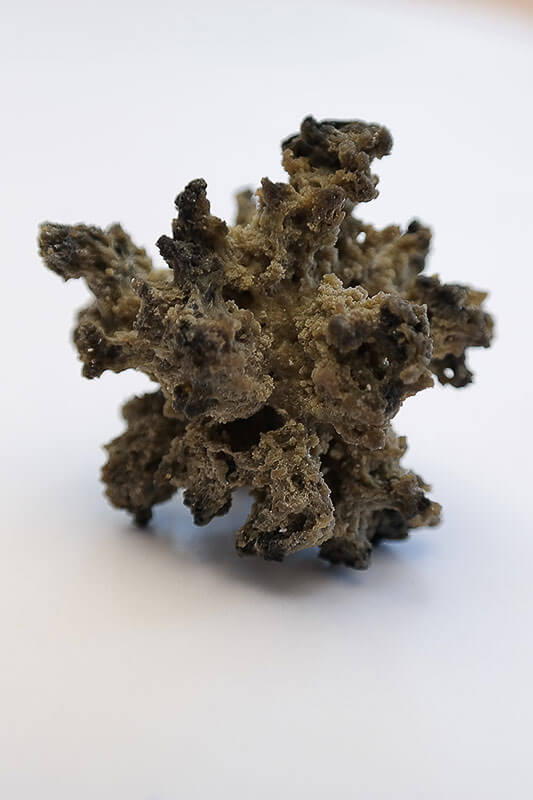
HOW FREQUENTLY DO I HAVE TO REFILL OR REPLACE THE SEALING LIQUID?


Doc Blue remains active as a puncture preventative for approx. 2000 km or 2-7 months. The period depends a lot of the temperature. After this time the sealant dries into a rubber film or separates into individual components („latex coral“ and liquid)..

Once the system is airtight, you do not have to refill sealant at all. Of course, the additional puncture protection works only if there is still active sealant inside the tire. We recommend to check and renew the sealant before a competition or a longer journey. If you do not mind the additional weight you can also just add sealant.

A simple test to see if the sealant is still working is using a needle. Just puncture the tire and let it rotate. If the hole is not sealed, it is time to refill. The “test hole” will be repaired by the new sealant.

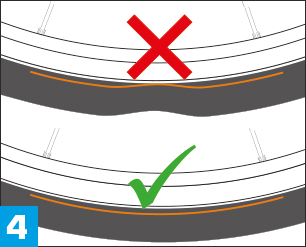
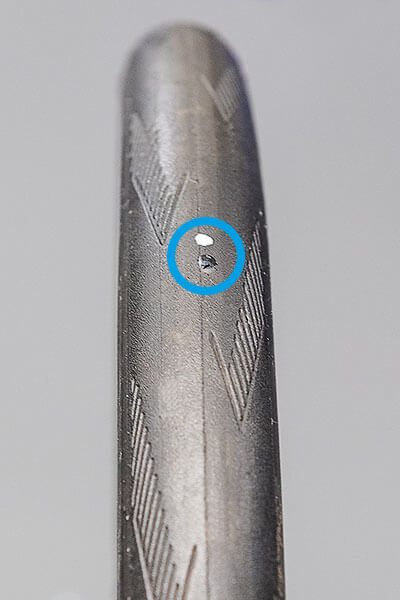
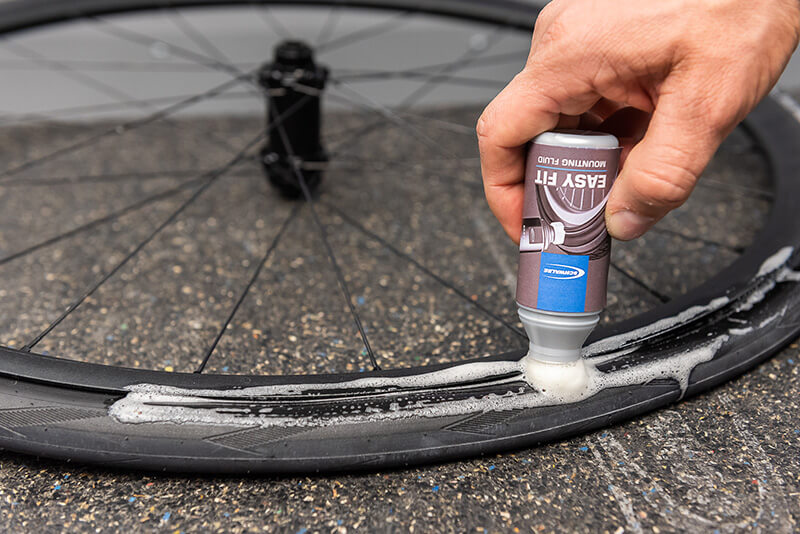
WHAT TO DO, IF THE TIRE DOES NOT INFLATE?


Inflating is frequently the biggest problem when mounting tubeless tires. Especially with rather classic rim shapes, that are not well designed for tubeless use. The air tends to blow uncontrolled between rim and bead. The following tricks help:
  • Check, that the valve is positioned between the tire beads, blowing air into the tire.
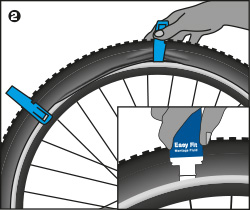
  • Use Mounting Fluid. Lubricating helps the tire beads to slide into the correct position more easily. In an emergency soapy water might also do the trick.
  • Remove the valve core for increased air flow.
  • When the tire seat is too loose, an additional layer of rim tape is frequently helpful to slightly increase the rim diameter.
  • If the tubeless rim tape is old, defect or has extreme dimples at the spoke holes, replace with new tubeless rim tape.
  • First, mount the tire with a tube and let sit for 24 hours to help stretch out the bead to the proper shape.
  • In very stubborn cases, use a compressor or the Schwalbe Tire Booster.

WHAT ELSE CAN GO WRONG?


Leaks can of course also happen at the valve or the rim. In order to find them, you have to put the complete wheel under water or if you do not have a tank large enough to submerge the complete wheel, spray the wheel with soapy water. If there are leaks, air will emit at the valve and/or spoke nipples. This may take a while, because the pressure has to build up in the rim cavity first. Frequently, the valve area is the problem. Possible remedy: Tighten the valve nut, clean and trim the contact area, replace valve or replace the tubeless rim tape. If all this does not help, there might be a defect at the rim joint or a crack in the rim base.

A frequent cause of a leaking tubeless system is the sealant has not been shaken enough before filling the tire (or before filling a small bottle from a large bottle). Therefore, many problems can be solved with a change to new, well shaken Doc Blue.

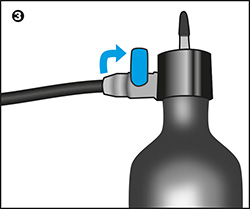
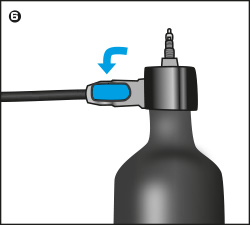
WHAT IS A TIRE BOOSTER?


For inflation of a tubeless tire you need a blast of air. Unfortunately, a floor pump is not sufficient for all wheels and only few people have a compressor at home. The Tire Booster solves this problem. It is basically a pressure tank, that you can fill with your floor pump up to 11 bar. The compressed air you can then empty with a single shot into the tire. This will settle even very stubborn tire and rim combinations.

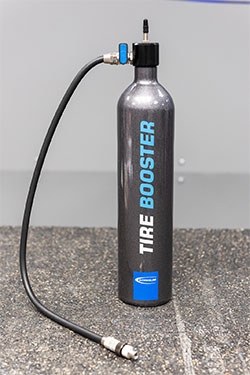
HOW TO USE THE TIRE BOOSTER?


Instruction manual & Safety instructions
The Tire BOOSTER supports you in the tubeless installation. All you need is the appropriate tubeless equipment and a high-pressure bicycle pump with attachment for Sclaverand valves.

Instruction: (1) Clean tire and rim before assembly. (2) Fit the tire onto the rim in the usual way. Coat both tire beads with mounting fluid before you inflate the tire. (3) Turn the ‘Air Valve’ on the Tire Booster to the CLOSED position. (4) Place the pump head of the Tire Booster onto the valve of the wheel. You can increase the airflow into the tire by using the adapter. Simply remove your current valve core, screw the adapter onto the pump head of the Tire Booster and screw both together onto the valve stem. (5) Pump up the Tire Booster with your track pump (max. 11 Bar/160 PSI). (6) Open the ‘Air Valve’. You will hear the tire pop into position on the rim. (7) Check the rim outline to make sure that the tire is correctly positioned. If further inflation is needed this can be done through the Tire Booster ONLY whilst the ‘Air Valve’ is in the OPEN position. (8) Remove the Tire Booster pump head. Add a sealing liquid into the tire if required (e.g. Doc Blue Professional) and inflate the tire again.
! Note:
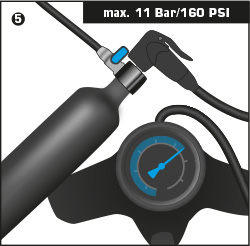
  • Do not exceed the maximum air pressure for the tire and rim.
  • Do not exceed the maximum air pressure for the Tire Booster: 11 Bar/160 PSI.
  • Never inflate the bottle with a compressor.
  • Do not use a defective bottle, tire or rim.
  • Do not release pressurized air into eyes or face.
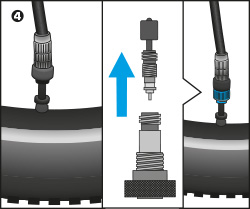
  • Before opening the ‘Air valve’: ensure pump head is attached securely to the valve of your wheel.
  • Protect the bottle from direct sunlight. Avoid temperatures of below -15°C (5*F) and above +50°C (120*F).
  • Store Tire Booster only with ‘Air Valve’ open.

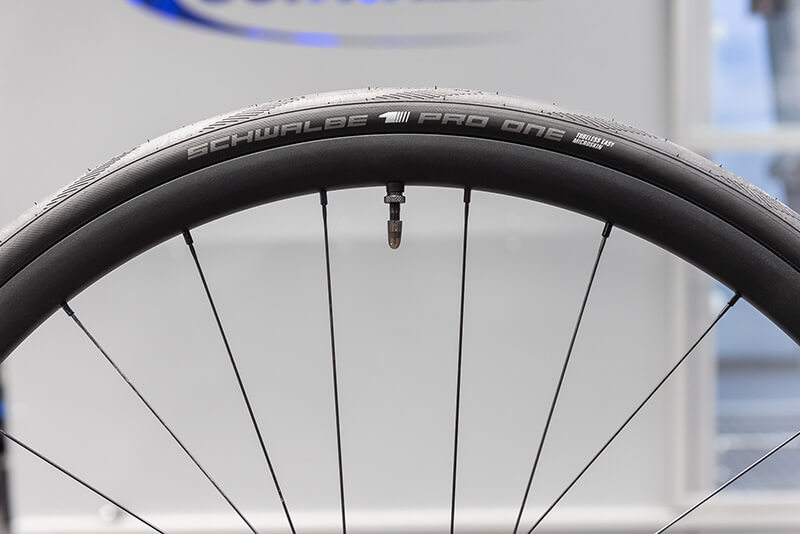
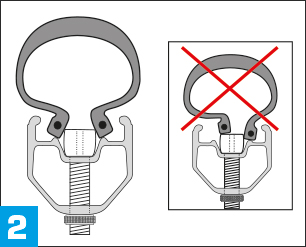
WHICH WHEELS ARE SUITABLE FOR TUBELESS?


! Note: For safety reason you should only use wheels, that are approved by the manufacturer for tubeless use.

This is particularly important for the high-pressure road bike system. The best option is a wheel that meets the latest ETRTO Road Tubeless Standard. This standard was only established in 2018 and Schwalbe was significantly involved. Concrete specifications for rim shoulder and drop center guarantee trouble free mounting and easy inflation with a floor pump.

Note: The wheel’s shoulder diameter is the diameter measured from shoulder to shoulder. This corresponds to the ETRTO number after the hyphen. In the case of SCHWALBE road bike tires, e.g. 28-622.

ETRTO Road Tubeless Standard. Wider rims for touring or off-road use have the same design with slightly different dimensions.

Many wheels, that claim to be Tubeless or Tubeless ready do not meet this standard, yet. You can still use them for tubeless tires, just be prepared that mounting might be more difficult. Frequently you need a compressor or the Tire Booster for inflation.

Find a list of road bike wheels that we tested for safety, mounting and inflation properties. 

Tubeless mounting is usually impossible for very narrow rims (13C), very cheap rims and rims with double eyelets. In these cases, it is not possible to ensure airtight sealing with the rim tape.

Be cautious with rims having a low bead hook height (clearly under ETRTO standard) or carbon rims without a bead hook. Derailing safety is greatly reduced. Some of these rims work very well with the right pressure, but you must absolutely follow the pressure indication of the wheel manufacturer, which are sometimes clearly below the maximum tire pressure.


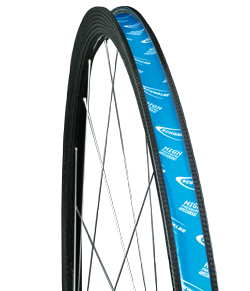
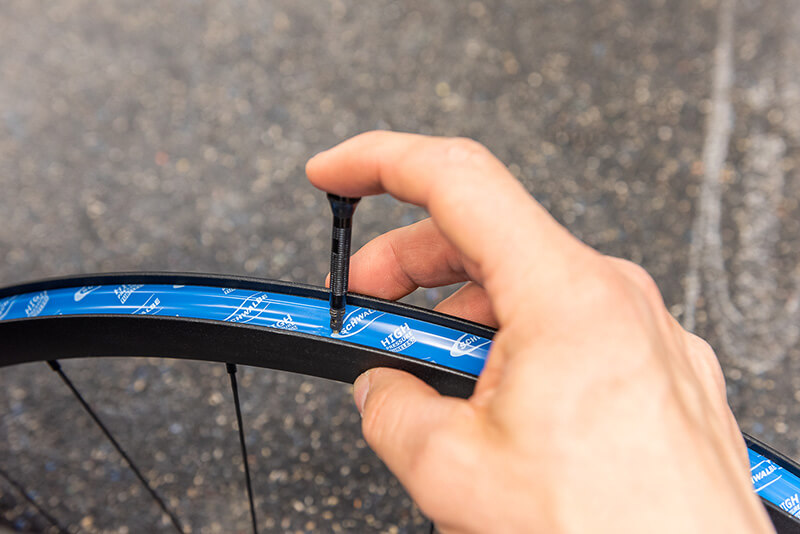
WHAT SHOULD I KNOW ABOUT RIM TAPE AND VALVE?


There are very few rims that are manufactured airtight. Normally, a special rim tape is used to seal them airtight.

The Schwalbe Tubeless Rim Tape is completely high-pressure and heat resistant. One ply of tape is usually sufficient. For rims with a small shoulder diameter, a second layer is helpful for better inflation properties.
Make sure all spoke holes are fully covered by the rim tape. It is best when the tape covers the complete rim base. The best fit is usually when the tape is 2-4 mm wider than the official rim width (which is measured from hook to hook)
The rim base must be completely clean and even. Remove old glue and grease residues with brake cleaner. Stretch the rim tape while applying to avoid bubbles. Overlap the tape 5-10 cm at the ends. We recommend to not have the overlapping portion in the valve area.
The Schwalbe Tubeless Valve is made of aluminum and very light. The conical valve base is reinforced with metal and fits in almost all rims. Simply press the Tubeless Valve, in the closed position, with the pointed end through the rim tape.
Even though not popular among racers, when riding tubeless the Valve Nut is absolutely necessary in order to fix the valve safely in the rim. The valve nut of the Schwalbe tubeless valve has an anti-twist protection to prevent the valve from coming loose unintentionally during a ride.

HOW TO HANDLE A FLAT?


Punctures are automatically sealed and repaired by Doc Blue during the ride. Important: Keep riding or press the punctured part to the ground. Flexing supports the function of the sealant. Do not hold the defect spot to the top.

In the case of large cuts or snake-bites the sealant may not work. For these events, a spare tube is still the best remedy. Just remove the tubeless valve and wipe out the sealant before installation. Any remaining sealant in the tire will not cause harm to the tube.

Register for the newsletter now

Don't miss any more trends and new products!

The link has been copied successfully
Paste it wherever you like.